
Feb 21, 2024

There are over 400K sites hosted on Webflow as of 2020, making it one of the most popular SaaS website platforms globally. Webflow's popularity lies in its ease of use - Webflow has made the process of web development easy by giving users the option to quickly select prebuilt themes, modify them, and get started.
But building a website is just one side of the coin. The website must attract organic traffic from search engines for a business to thrive. And that's where SEO comes in.
This article gives you a step-by-step guide to optimize your Webflow site for search engines. Whether you are an independent developer or a Webflow design agency, building a Webflow site by incorporating these 5 steps is essential.
STEP 1 - Define a Content Structure With Headings (H1 - H6) & Paragraphs
The secret to SEO is relevance and ease of use: how relevant your content is to the user's query and how easily that user can find what they are looking for on your page or blog. Every Webflow design agency should focus on these two aspects because they exactly are what search engines look for when ranking a page on SERPs.
Create a content hierarchy before you begin drafting content or designing a page. The design and content should be the outer facade, and the hierarchy should be the inner structure.
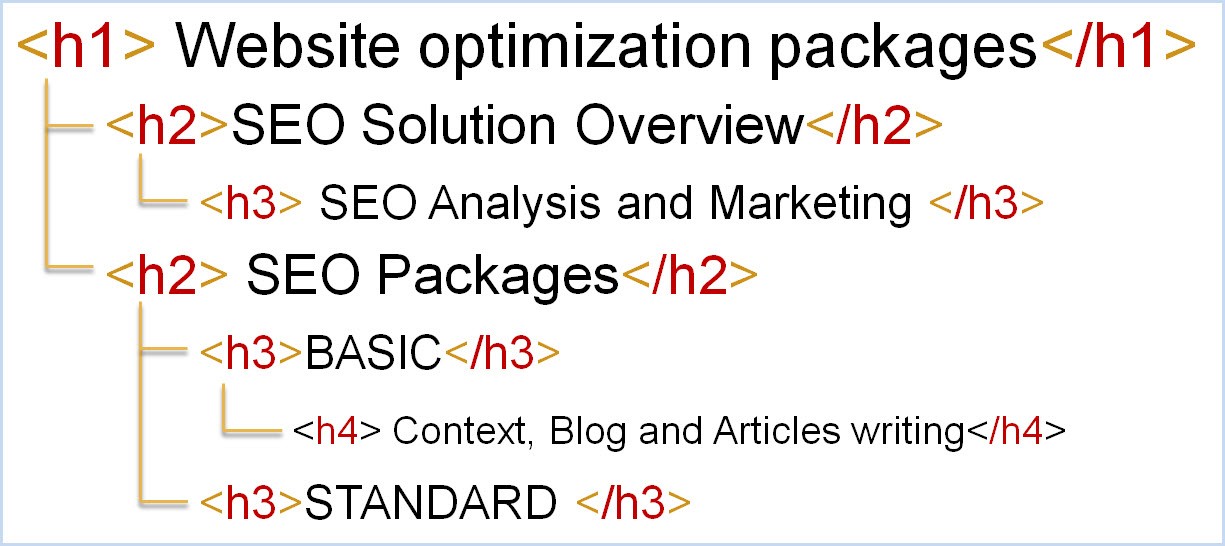
The page needs an H1 title (do not add more than one and make sure you include your core keyword), a couple of H2 and H3 titles, optional H4 - H6 titles, and paragraphs. You automatically get a hierarchy when you break your content down into headings and subheadings.
Having a content structure makes it easy for the user to quickly scroll to the section they need and get the answer they want. In addition, it makes the pages easy to use, which, as we mentioned earlier, is one critical requirement for ranking.
STEP 2 - Follow SEO 101s for Pages & Blogs
When you start drafting the content, you want to follow these SEO best practices to increase the chances of raking on the first page:
Perform keyword research and select a set (20 - 30 KWs is a good starting point) of core keywords you will target based on brand relevance.
Group these keywords based on relevancy to each other. For example, a brand selling clothes can group the keywords 'buy shirts online' and 'buy formal shirts online' and target them on a single page.
Create pages and blogs for each group of keywords. The purpose is to have a standalone page/blog that gives users the information they need for each keyword. Adding all keywords to a few pages dilutes their relevancy, which isn't good for SEO.
Use the primary keyword in the H1 title, in an H2 title, and in the body of the article. Sticking to a KW density of 1-2% is sufficient. Follow the same rule for any other keywords you have chosen.
Draft the meta title and description with the keywords included. Make sure the keywords appear towards the beginning of the title and description. In Webflow, head to Page Settings -> SEO settings to add meta content.
Add alt-tags to each image. The purpose, again, is relevancy - the alt-tags must be added to explain the image and not just to stuff keywords. This will help your site rank in the 'image search' section.
Use anchor texts (which are preferably keywords) and link them to internal pages and blogs.
For blogs and articles add a few external links, especially where stats and facts are used. This indicates to search engines that your article is tailored towards the benefit of the user.
If possible, add the primary keyword as the slug (the page URL).
Adding meta content on Webflow:

STEP 3 - Design a Crisp Site Navigation Structure
Once you have a content strategy in place, it's important to make that content available to the user in the best possible way. Plan out your website navigation structure during the UX design phase of Webflow development.
Have a clearly defined header menu. Add menu items that will give your users all the information they need to know your brand, find the product/service they are looking for, and get other information like pricing.
Use dropdowns to group links together. A menu bar with excessive options will quickly overwhelm the user.
Links added to the body of the page should be clearly visible - underline and bold anchor words.
Add navigation links in the footer for good measure.
STEP 4 - Set the Right Webflow Settings for SEO
Webflow developers have one advantage over others: Webflow provides site optimization features within the platform.
Head over to Project Settings → Hosting → Advanced Publishing Options and switch on the following:
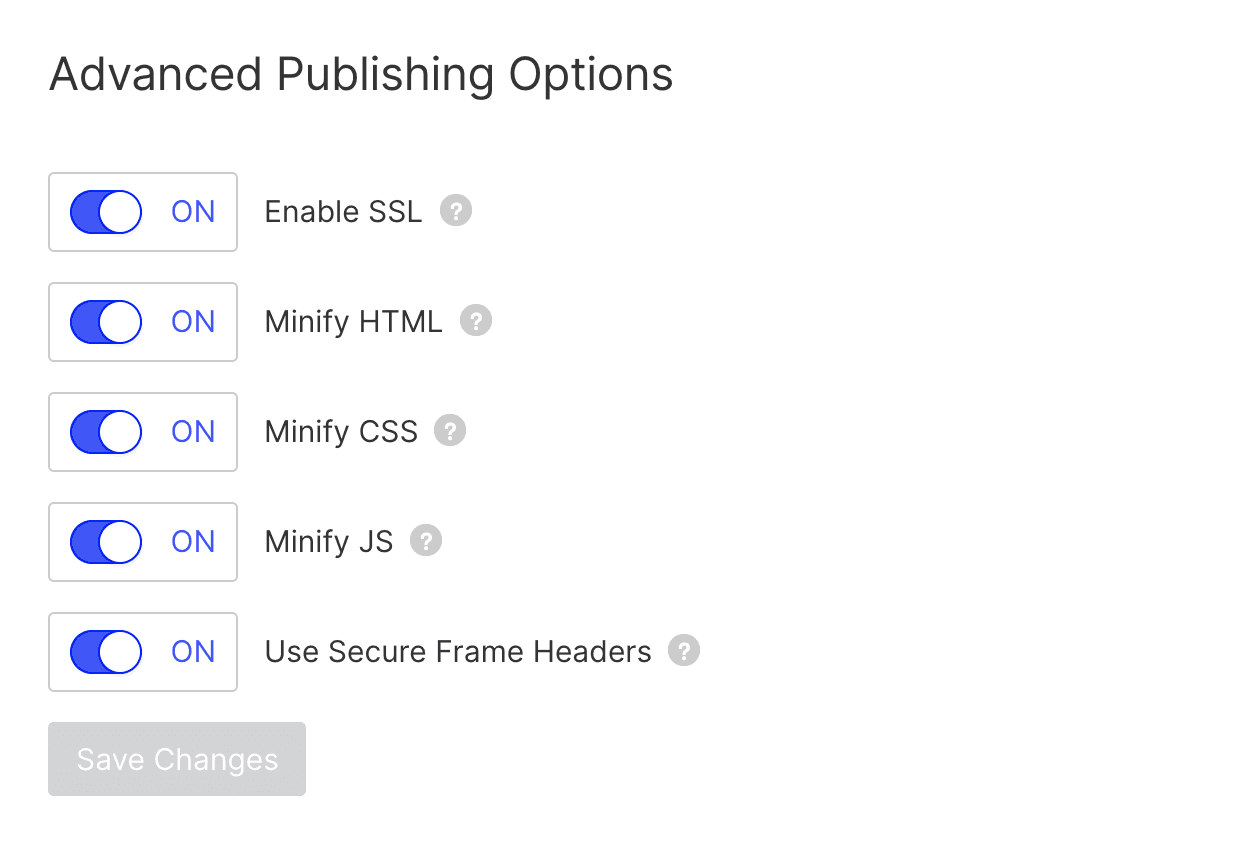
These settings will increase site performance and optimize it for search engines, saving you time on technical SEO.
Next, head over to Project settings →SEO tab → Sitemap and enable the auto-generated sitemap. Webflow will automatically create a sitemap and update it for you.
Lastly, set the robots.txt file. Navigate to Project Settings → SEO → Indexing and create a robots.txt file.
STEP 5 - Use Google's Search Console to Get SEO Insights
Google's Search Console is a great product offering you actionable SEO insights. Integrating Search Console (and many other third-party products) with Webflow is simprewarding and straightforwardrstly, create a Google Search Console property for your site:
Log in to Google Search Console using a Google account
Navigate to the left panel and add a new property
Add the entire domain (preferred) or a single URL depending on what you want to track
Choose the HTML tag option under other verification methods
Copy the Verification ID.
Next, head over to your Webflow project to connect Search Console:
Navigate to Page Settings -> SEO settings on Webflow
Paste the verification ID you copied earlier
Save changes and click 'publish website.'
Head back to Search Console and click 'verify.'
Search Console may take a few days to populate data, after which you can analyze URLs, site coverage, traffic performance, search queries, sitemap status, interlinks, and more.

Conclusion
While this is not an SEO tip per se, an important step 6 is having patience and staying consistent. SEO could even take a year to deliver results, depending on your business niche. Results, however, can only be achieved through consistent SEO work by consistently posting optimized content that adds value to your visitors.


" width="24px"><path d="M 0 24 L 0 0 L 24 0 L 24 24 Z" fill="transparent" height="24px" id="Wsj_xAGHa" width="24px"/><path d="M 18 0 L 6 0 C 2.7 0 0 2.7 0 6 L 0 18 C 0 21.299 2.7 24 6 24 L 18 24 C 21.299 24 23.999 21.299 23.999 18 L 23.999 6 C 23.999 2.7 21.299 0 18 0 Z M 21.999 18 C 21.999 20.205 20.206 22 18 22 L 6 22 C 3.795 22 2 20.205 2 18 L 2 6 C 2 3.794 3.795 2 6 2 L 18 2 C 20.206 2 21.999 3.794 21.999 6 Z" fill="rgb(204, 202, 192)" height="24px" id="MyIybPesa" width="23.9994px"/><path d="M 1.5 3 C 2.328 3 3 2.328 3 1.5 C 3 0.672 2.328 0 1.5 0 C 0.671 0 0 0.672 0 1.5 C 0 2.328 0.671 3 1.5 3 Z" fill="rgb(204, 202, 192)" height="2.99993px" id="vBfo_rUgb" transform="translate(17.001 4)" width="2.9999000000000002px"/><path d="M 6 0 C 2.686 0 0 2.686 0 6 C 0 9.313 2.686 12 6 12 C 9.313 12 12 9.313 12 6 C 12 2.686 9.313 0 6 0 Z M 6 10 C 3.791 10 2 8.209 2 6 C 2 3.79 3.791 2 6 2 C 8.209 2 10 3.79 10 6 C 10 8.209 8.209 10 6 10 Z" fill="rgb(204, 202, 192)" height="12.0003px" id="CMwk2okKA" transform="translate(6 6)" width="11.9997px"/></g></svg>)
" height="23.17099px" id="vqO63JQxv" transform="translate(8.236 2.929)" width="12.498969999999998px"/></svg>)
" width="24.000299719848634px"><path d="M 0 24 L 0 0 L 24 0 L 24 24 Z" fill="transparent" height="24px" id="Mzy6fD77D" width="24px"/><path d="M 15.505 16.426 L 15.511 16.425 L 15.511 7.623 C 15.511 3.317 14.584 0 9.55 0 C 7.13 0 5.506 1.328 4.843 2.587 L 4.773 2.587 L 4.773 0.402 L 0 0.402 L 0 16.425 L 4.97 16.425 L 4.97 8.491 C 4.97 6.402 5.366 4.382 7.953 4.382 C 10.502 4.382 10.54 6.766 10.54 8.625 L 10.54 16.426 Z" fill="rgb(204, 202, 192)" height="16.42598px" id="HYQJ2gsFP" transform="translate(8.489 7.574)" width="15.51104px"/><path d="M 0 0 L 4.976 0 L 4.976 16.023 L 0 16.023 Z" fill="rgb(204, 202, 192)" height="16.02304px" id="ViNoCHdVu" transform="translate(0.396 7.977)" width="4.976006px"/><path d="M 2.882 0 C 1.291 0 0 1.291 0 2.882 C 0 4.473 1.291 5.791 2.882 5.791 C 4.473 5.791 5.764 4.473 5.764 2.882 C 5.763 1.291 4.472 0 2.882 0 Z" fill="rgb(204, 202, 192)" height="5.791px" id="sBXUIOzkZ" width="5.764px"/></g></svg>)
" width="22px"><path d="M 0 22 L 0 0 L 22 0 L 22 22 Z" fill="transparent" height="22px" id="w6uWR0FhG" width="22px"/><path d="M 12.811 9.316 L 20.825 0 L 18.926 0 L 11.968 8.089 L 6.41 0 L 0 0 L 8.404 12.231 L 0 22 L 1.899 22 L 9.247 13.458 L 15.117 22 L 21.527 22 L 12.811 9.316 Z M 10.21 12.339 L 9.359 11.121 L 2.583 1.43 L 5.5 1.43 L 10.968 9.251 L 11.82 10.469 L 18.927 20.635 L 16.01 20.635 L 10.21 12.34 Z" fill="rgb(204, 202, 192)" height="22px" id="achXGnXXP" transform="translate(0.236 0)" width="21.526972px"/></g></svg>)
" height="23.31396px" id="VUTAjGkst" transform="translate(0 1.186)" width="17.8283px"/><path d="M 0 0 L 7.595 0 C 12.489 0 16.457 3.82 16.457 8.533 C 16.457 13.246 12.489 17.067 7.595 17.067 L 5.064 17.067 L 5.064 21.943 L 0 21.943 Z M 5.064 12.19 L 7.595 12.19 C 9.693 12.19 11.393 10.553 11.393 8.533 C 11.393 6.513 9.693 4.876 7.595 4.876 L 5.064 4.876 Z" fill="rgb(204, 202, 192)" height="21.9426px" id="KJ3s5dgYH" transform="translate(2.057 0.5)" width="16.456960000000002px"/></svg>)